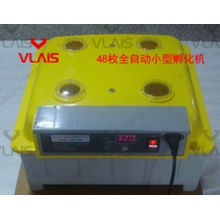
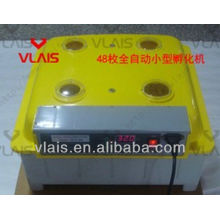

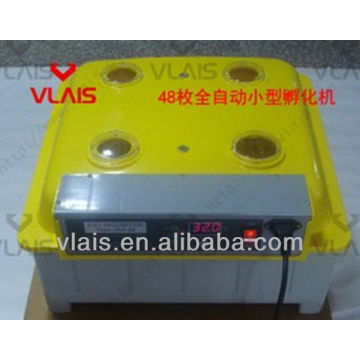

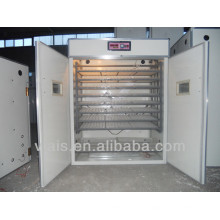
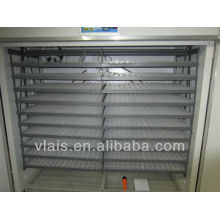
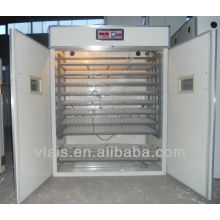
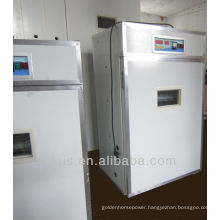
cheap chicken egg incubator Factory Supply small 48 full automatic controller chicken New design egg incubator
Basic Info
Model No.: V-48
Product Description
Specifications 1. durable
2. safe and reliable, easy to operate
3. easy installation and maintenance
4. applicable for small business
 Technical Specification


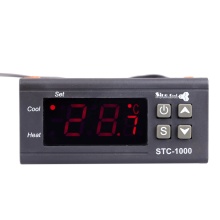
 1. Testing you unit for the first time: 1.1 Connect the egg turner plug to the control plug inside the egg compartment. 1.2 Connect the provided power supply to the back of the unit and your power source. 1.3 Switch on your power source. 1.4 Switch your unit on. 1.5 You will hear an alarm sounding due to low temperature/humidity. 1.6 Press any of the green buttons to cancel the alarm. 1.7 By opening the incubator and filling the water channels you will notice the humidity reading increase. 1.8 Let the unit run for 2 hours to note the egg turner turning. 2. Setting the temperature 2.1 Push “SET” once. 2.2 Push “+” or “-“ to select the desired temperature. 2.3 Push “SET” once more to exit. - These incubators are factory set at 38oC, I found the chicks hatch at day 19 to 20 meaning the temperature being to high. Using the method as described above. I recommend you set the temperature at 37.6oC. 3. Temperature alarm parameter settings (AL and AH) The temperature alarm is factory set to sound at 1oC over or below the set temperature. This is sufficient and you do not need to make any changes to these settings. 3.1 Low temperature alarm parameter setting. (AL) 3.1.1 Press and hold “SETT” for 3 sec. 3.1.2 Push “+” or “-“ until code “AL” appears in the temperature screen. 3.1.3 Push “SET” 3.1.4 Push “+” or “-“ to adjust to your desired lower alarm setting. 3.2 Higher temperature alarm parameter setting (AH) 3.2.1 Press and hold “SETT” for 3 sec. 3.2.2 Push “+” or “-“ until code “AH” appears in the temperature screen. 3.2.3 Push “SET” 3.2.4 Push “+” or “-“ to adjust to your desired higher alarm setting. 4. Humidity alarm parameter settings (AS) The humidity alarm is factory set to sound at 45% humidity. This is sufficient and you should not deed to make any changes to these settings. 4.1 Low humidity alarm parameter setting. (AS) 4.2 Press and hold “SETT” for 3 sec. 4.3 Push “+” or “-“ until code “AS” appears in the temperature screen. 4.4 Push “SET” 4.5 Push “+” or “-“ to adjust to your desired lower alarm setting.- By filling both water channels the humidity should rise to 60% dependant on the local humidity levels and the time of year. I tend to fill both my water channels every 4 to 5 days and at day 18 when I remove the egg trays I over fill them to increase the humidity to about 65%. 5. Calibrating temperature sensor reading (CA) The thermometer correct reading is set at 0oC. The reading given by the thermometer can be adjusted if you find that the temperature reading is incorrect using a calibrated thermometer. 5.1 Calibrating the temperature sensor measurement. (CA) 5.2 Press and hold “SETT” for 3 sec. 5.3 Push “+” or “-“ until code “CA” appears in the temperature screen. 5.4 Push “SET” 5.5 Push “+” or “-“ to adjust to the correct measurement. - Note that the adjustment is the difference between the thermometer readings and should be adjusted with “- “ if the temperature reading of the incubator is to high and normal value (indicating + value) if the incubator reading is too low. 6. Temperature Upper and lower limit set (HS and LS) HS - (High Set) and LS - (Low Set) set the limit of the setting range of the desired temperature setting (incubating temperature adjustment) If HS is set as 38.2 and LS is set as 37.4, then the desire temperature (incubating temperature adjustment) can only be changed from 38.2 to 37.4, so the minimum temperature shall be limited to 37.2 even if the “-“ is kept on pressing. The same goes for the High Set Limit. - This is to prevent accidental out of range temperature setting. 7. Heating Element (HU and HD) Parameter HU and HD, set by factory and is not supposed to be modified by user. HU - Default setting is 18 ( I believe it’s Heat Up power setting, controlling the start up power to the heater to bring it up to the desired temperature setting (incubating temperature adjustment). Setting Range 1~90. HD - Default setting is 11 ( I believe it’s Heat Down power setting, controlling the power to maintain the heater at the desired temperature setting (incubating temperature adjustment). Setting Range 1~80. - These are settings I have never adjusted or attempted to adjust as the heating unit starts and stops within 1oC of my set temperature of 37.6oC. 8. Display Symbols
9. Using your Incubator 1. Test your incubator to see if it functions properly. 2.Connect the egg turner plug to the control plug inside the egg compartment. 3. Fill one or both water channels depending on local humidity levels. 4. Set the eggs with the pointy side down. 5. Close the lid and switch on the incubator. 6. Press the reset button (left green button) to reset and start the day counter from “0”. (this will also rest the egg turning countdown back to 1:59) 7. Keep an eye on the humidity reading and fill the water channels when needed. (normally every 4 days) 8. At day 18 you should remove the tray with the turning mechanism and place the eggs on top of he bottom grid. 9. At the same time it is important to fill both water channels to increase the humidity. (this is very important to ensure that the eggshells are soft enough for the chicks to break through.) 10. You should never open the lid when the chicks start to hatch. If you do, the loss of humidity will cause the eggshells of the unhatched eggs to dry out and they won’t able to break through the egg. Contact us if you need more details on new design egg incubator. We are ready to answer your questions on packaging, logistics, certification or any Other aspects about chicken egg incubator、cheap chicken egg incubator. If these products fail to match your need, please contact us and we would like to provide relevant information.
2. safe and reliable, easy to operate
3. easy installation and maintenance
4. applicable for small business
 Technical Specification
 | Model | V-48 incubator |
| egg capacity | 48 |
| Voltage | 220 |
| Frequency | 50/60 |
| Rated Power | 80 |
| Machine size(m) | 0.51*0.29*0.52 |
| Volume(m3) | 0.07 |
| Packing weight(kg) | 7 |


 1. Testing you unit for the first time: 1.1 Connect the egg turner plug to the control plug inside the egg compartment. 1.2 Connect the provided power supply to the back of the unit and your power source. 1.3 Switch on your power source. 1.4 Switch your unit on. 1.5 You will hear an alarm sounding due to low temperature/humidity. 1.6 Press any of the green buttons to cancel the alarm. 1.7 By opening the incubator and filling the water channels you will notice the humidity reading increase. 1.8 Let the unit run for 2 hours to note the egg turner turning. 2. Setting the temperature 2.1 Push “SET” once. 2.2 Push “+” or “-“ to select the desired temperature. 2.3 Push “SET” once more to exit. - These incubators are factory set at 38oC, I found the chicks hatch at day 19 to 20 meaning the temperature being to high. Using the method as described above. I recommend you set the temperature at 37.6oC. 3. Temperature alarm parameter settings (AL and AH) The temperature alarm is factory set to sound at 1oC over or below the set temperature. This is sufficient and you do not need to make any changes to these settings. 3.1 Low temperature alarm parameter setting. (AL) 3.1.1 Press and hold “SETT” for 3 sec. 3.1.2 Push “+” or “-“ until code “AL” appears in the temperature screen. 3.1.3 Push “SET” 3.1.4 Push “+” or “-“ to adjust to your desired lower alarm setting. 3.2 Higher temperature alarm parameter setting (AH) 3.2.1 Press and hold “SETT” for 3 sec. 3.2.2 Push “+” or “-“ until code “AH” appears in the temperature screen. 3.2.3 Push “SET” 3.2.4 Push “+” or “-“ to adjust to your desired higher alarm setting. 4. Humidity alarm parameter settings (AS) The humidity alarm is factory set to sound at 45% humidity. This is sufficient and you should not deed to make any changes to these settings. 4.1 Low humidity alarm parameter setting. (AS) 4.2 Press and hold “SETT” for 3 sec. 4.3 Push “+” or “-“ until code “AS” appears in the temperature screen. 4.4 Push “SET” 4.5 Push “+” or “-“ to adjust to your desired lower alarm setting.- By filling both water channels the humidity should rise to 60% dependant on the local humidity levels and the time of year. I tend to fill both my water channels every 4 to 5 days and at day 18 when I remove the egg trays I over fill them to increase the humidity to about 65%. 5. Calibrating temperature sensor reading (CA) The thermometer correct reading is set at 0oC. The reading given by the thermometer can be adjusted if you find that the temperature reading is incorrect using a calibrated thermometer. 5.1 Calibrating the temperature sensor measurement. (CA) 5.2 Press and hold “SETT” for 3 sec. 5.3 Push “+” or “-“ until code “CA” appears in the temperature screen. 5.4 Push “SET” 5.5 Push “+” or “-“ to adjust to the correct measurement. - Note that the adjustment is the difference between the thermometer readings and should be adjusted with “- “ if the temperature reading of the incubator is to high and normal value (indicating + value) if the incubator reading is too low. 6. Temperature Upper and lower limit set (HS and LS) HS - (High Set) and LS - (Low Set) set the limit of the setting range of the desired temperature setting (incubating temperature adjustment) If HS is set as 38.2 and LS is set as 37.4, then the desire temperature (incubating temperature adjustment) can only be changed from 38.2 to 37.4, so the minimum temperature shall be limited to 37.2 even if the “-“ is kept on pressing. The same goes for the High Set Limit. - This is to prevent accidental out of range temperature setting. 7. Heating Element (HU and HD) Parameter HU and HD, set by factory and is not supposed to be modified by user. HU - Default setting is 18 ( I believe it’s Heat Up power setting, controlling the start up power to the heater to bring it up to the desired temperature setting (incubating temperature adjustment). Setting Range 1~90. HD - Default setting is 11 ( I believe it’s Heat Down power setting, controlling the power to maintain the heater at the desired temperature setting (incubating temperature adjustment). Setting Range 1~80. - These are settings I have never adjusted or attempted to adjust as the heating unit starts and stops within 1oC of my set temperature of 37.6oC. 8. Display Symbols
 Number | Symbol | Meaning | Factory Setting |
3.1 (above) | AL | Low temperature alarm parameter setting | 1oC |
3.2 (above) | AH | Higher temperature alarm parameter setting | 1oC |
4.1 (above) | AS | Low humidity alarm parameter setting | 45% |
5.1 (above) | CA | Calibrating the temperature sensor reading | 0oC |
6 (above) | HS | Temperature higher limit set | 39.5oC |
6 (above) | LS | Temperature lower limit set | 30oC |
7 (above) | HU | Heating starts | 18 |
7 (above) | HD | Heating stops | 11 |
Product Categories : Incubator Equipment > incubator
Premium Related Products

Other Products
Hot Products
High Head lift with Piston Structure Liquid Pump Used for Oil and NH43 Wheel Trailor Generator 20KW Diesel 4B3.9G Engine and 13 KW Power Pump2KVA Welding Generator with 3 Phase 4 Holes Socket and European Standard Panel5KVA Gasoline Generator 127V 220V 380V 50HZ 60HZ Electric Start or By Hand Start100KW/136hp Prime Power Diesel Generator with Cummins Engine 6BTA5.9-G2300KW Natural Gas Generator Deutz TBD236V8 Engine with HCI444FS Alternator30KW Ricardo K4100 Open Type Diesel GeneratorSteyr Diesel Generator 150KW/204 Horsepower1104C-44TAG2 1104C-44TAG2 100KW Open Type Diesel Generator40' Containerized Silent 2000KW Diesel Generator80dB Noise proof 250KW Spare Used Electric Generator Supply Machine1.5 Inch 400L Diesel Water Pump6.5 KVA Air Cooled Silent Generator Used for Oven Fridge TV Computer Air Condition and lights119 Horsepower 7.52 L Displacement Truck Used Diesel Engine18 KW/ 24 Horse Power Tractor Diesel Engine Used in Agriculture226 m Head 28 m3/h Water Pump Diesel Engine